
Freezer jam has become a favorite in my house! Easy to make with no pressure canning required! Just Mason jars and some freezer space needed.
When the berries are in season, I just want to preserve that perfect fresh flavor!
I previously made raspberry freezer jam using the traditional recipe. But now I've tried it using the lower sugar option. Because, you know, everyone wants to be a little bit healthier, right?
I was fully prepared to say that the less sweet version was worth it just for the health aspects. But after trying both, I honestly feel that the low sugar version is better! More of the fresh raspberry taste comes shining through in every bite. You will love this jam!

Would you like to save this recipe?
Why I love this recipe
Describing freezer jam starts with my favorite word: easy. With only 3 ingredients and very few steps, you can make homemade jam that you will love!
My mom used to make jam, mostly strawberry. She always used Sure-Jell, like I do here. But she cooked the jam and preserved it by layering some paraffin wax over the top of the jam, then pressure cooking the jars to seal the lids. I'd rather just freeze. 😍
You don't cook the berries when making freezer jam, which helps to preserve their delicious fresh taste. And I was a little surprised, but using less sugar actually makes the raspberry taste more obvious. Talk about a win-win!
Ingredients

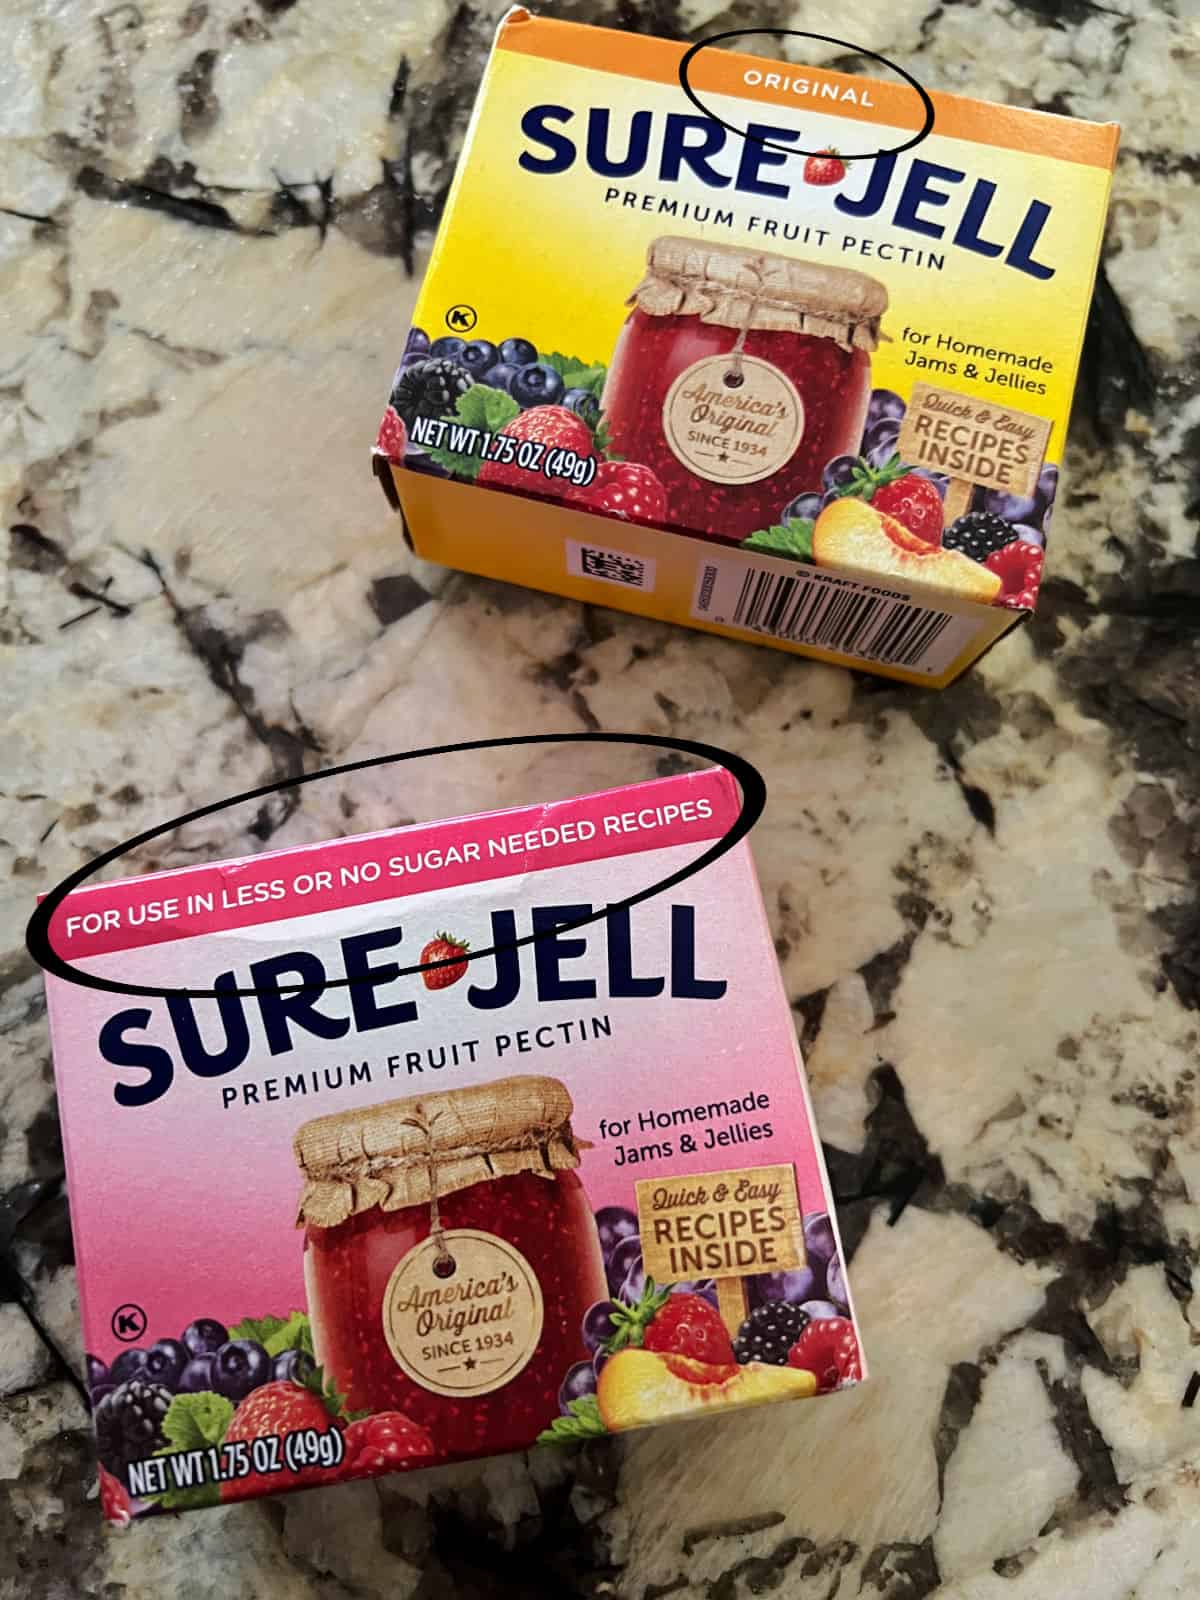
Please note: there are 2 different versions of Sure-Jell, in different colored packages. Make sure you're using the low sugar version with this recipe.
How to make Lower Sugar Raspberry Freezer Jam
Prep the jars
You'll want to clean your jars before making the jam. In theory, this recipe makes about 7 cups of jam, but I always seem to need more than 7 (8 ounce) jam jars, so be sure to have extras all set to go.
I like to wash the jars and lids, preferably in the dishwasher if I've managed to plan ahead. Unlike for traditional jam, it is not strictly necessary to go through a full sterilization of the jars. (Another big advantage of freezer jam) Even so, I like to do a quick dip of the jars in boiling water just to feel confident that they are really clean.
Make the jam
If you've made freezer jam with the original version of Sure-Jell, you probably think you know how this goes. But the directions are different for the low-sugar recipe, so be sure to take note of those differences.
Start with 6 cups (3 pints) of fresh raspberries. Place the berries in a large bowl and mash them with a potato masher. As an alternative, you can use a food processor but do not puree completely. Just pulse a few times to break up the berries. You should end up with about 3 cups of crushed berries.

Now, in a large saucepan, add sugar, water and the Sure-Jell. Stir together and bring this mixture to a boil. Boil for one full minute, stirring constantly.
Pour the pectin solution over the crushed raspberries and mix to combine. Stir this for one minute to ensure it is well blended.
You can now spoon the mixture into the jars. Leave at least ½ inch of space at the top of each jar to allow the jam to expand as it freezes. Wipe the rims (trust me, you'll always need to do this) and then cover each jar with a lid.

The jars need to sit at room temperature for 24 hours. This will allow it to cool and to "set" - i.e. form a slightly gelatinous mixture rather than a runny liquid. At this point, you can label the jars and place them on a shelf in your freezer. You'll want to put one in the fridge for immediate enjoyment. 😄

Also note that freezer jam is "softer" than traditional jam. So it doesn't have a firm gelatin-like texture. Instead it is only slightly gelatinous, which IMO makes it easier to spoon and spread. This is true for both the regular raspberry freezer jam as well as this low sugar version.

Expert Tips/FAQ
In traditional jam, the fruit is cooked first by simmering with sugar and possibly lemon juice and/or pectin. For freezer jam, the fruit is not cooked, or barely cooked. This helps retain the fresh taste of the fruit or berries used.
No, the jars do not seal. Sealing is necessary when storing preserves at room temperature, but not for freezing.
Once frozen, the jam can be kept for up to a year. If frozen, thaw in the refrigerator before using. In the refrigerator, the jam is good for 3-4 weeks, after which it will start to lose some of its fresh flavor.

Love Raspberries? You might enjoy some of these recipes:
- Raspberry Balsamic Vinaigrette Dressing
- Raspberry Nice Cream
- Raspberry Sauce from Frozen Berries
- Keto Raspberry Sauce
- Raspberry Brie with Honey & Almonds
📖 Recipe
Would you like to save this recipe?

Low Sugar Raspberry Freezer Jam
Ingredients
- 6 cups fresh raspberries
- 3½ cups sugar granulated
- 1 cup water
- 1¾ ounces low sugar Sure-Jell powdered fruit pectin 1 package, pink
Instructions
- In a large bowl, mash the raspberries with a potato masher until mostly reduced. You can also use a food processor for this step but do not puree the berries completely. You should end up with about 3 cups of crushed berries.6 cups fresh raspberries
- In a large saucepan, mix the water, sugar, and pectin. Heat to boiling, stirring constantly. Boil and stir for 1 minute.3½ cups sugar, 1 cup water, 1¾ ounces low sugar Sure-Jell powdered fruit pectin
- Pour the hot pectin mixture over the raspberry mixture and stir constantly for 1 minute.
- Immediately spoon the hot mixture into freezer-safe jars/containers. Leave at least ½ inch of space at the top of each jar to allow for expansion.
- Wipe the rim of each jar, then seal with lid.
- Let the jars stand at room temperature for 24 hours to set. Then, transfer to the freezer to store for up to 12 months, or in the refrigerator for up to 3 weeks.
- Once frozen, thaw the jam in the refrigerator and stir before serving.
Nutrition
Nutrition values are estimates only, using online calculators. Please verify using your own data.
Mel
Do I use only 3 cups smashed berries for this recipe or 6?
Sula
It is 6 cups of whole berries, and when you mash them it measures about 3 cups. Hope this helps 🙂
Sandy Hulke
Can you use frozen raspberries instead of fresh. I have a five gallon bags in my freezer!
Sula
Yes I believe those would work just fine!
Susan
Followed the recipe exactly. The jam doesn't seem to be setting much at all at the 20 hour mark while resting at room temperature in jars. Does it usually take the full 24 hours or longer for it to start gelling? How thickened up should I expect the jam to be before freezing?
Sula
This is not a super thick jam. As I noted above, it is softer than commercial jam. I don't usually judge it based upon the thickness, I just put the jars in the freezer teh next day.
Cindy
I only have liquid pectin. Can it be used in this recipe and if so, how much?
Sula
I've never tried liquid pectin so I'm sorry, I really can't answer that.
Lee
what can I do if the jam doesn't set up?
Sula
If you used Sure-Jell, you can re-set with more of it. You need to first measure the exact amount of unset jam you have. Then, for every 4 cups of jam, use 3/4 cup water and 1 more package of Sure-Jell (the same package you used before). Heat the water and SureJell in a small saucepan, bring to a boil and boil for one full minute.Add the jam to the saucepan and combine, then bring this mixture back to a boil. Cook for one more minute, then remove from heat. Spoon this back into your jars, cover and let stand at room temperature for another 24 hours.
Bonnie
can you use a sugR substitute splenda?
Sula
I haven't had a chance to try that yet so I don't know, sorry.